Solving Network Problems
If a client computer cannot connect to the server, (the network is down or
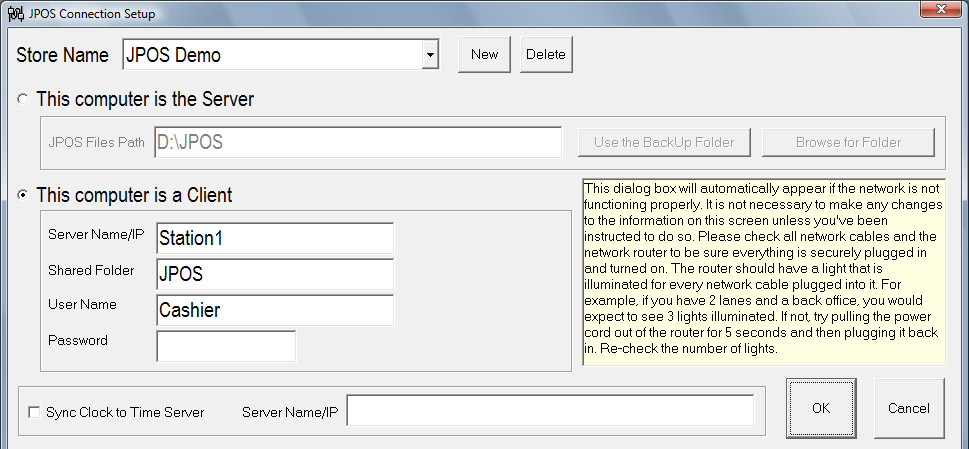
the server is down) the "JPOS Connection Setup" dialog box will appear.
The "Store Name" field will have your store name instead of "JPOS
Demo". For a client computer, the Server section is grayed out. So, for a client
computer, it does not matter what is in the "JPOS Files Path" field of
the Server section. Don't experiment. The settings in this dialog box will not
change on their own. You will not usually have to change any settings unless this
is an initial setup of a new computer. For new computers, make sure the settings
match the dialog box shown below. If your location uses a VPN or you are not sure,
please contact us for help. Click OK to save and close
the dialog box.
Default settings for a JPOS client station:
Now try to run the JPOS touchPOS program. If you still cannot connect to the server
and this dialog box re-appears, you will need to troubleshoot the network problem.
Generally, network problems are either caused by a network cable that has come unplugged,
a router (or switch - depending on your network setup) that has "locked up"
and stopped working, or a change to (or new installation of) a software firewall
program such as Norton Internet Security or Windows Firewall. You should be aware
of the location of the router so you will be able to troubleshoot network problems.
The first thing to check is the network cable. In Windows XP and Vista, if a network
cable becomes unplugged, look at the System Tray area (bottom right section of your
computer screen), look for an icon with a red X (the icon below the arrow).
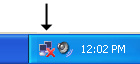
This icon represents a disconnected network adapter. Typically, a network cable
runs from the computer network adapter to a router. If you see this icon then either
a network cable has come unplugged from the back of the computer, the cable has
come unplugged from the router, or the router has lost power. Check the other computers
on the network to see if they also have this "disconnected network" icon.
If more than one computer has this icon then most likely the router has lost power
or locked up. In this case, locate the router, if it is off, find the power plug
and plug it in. If the router is on, pull the power plug out, wait 5 to 10 seconds
then plug the power plug back into the router. Now re-check the computers for the
"disconnected network" icon. If the icon is gone then try to run the JPOS
touchPOS program. If the "disconnected network" icon is still in
the System Tray then check the network cable in the back of the computer. Re-start
the computer by using the normal restart method (click Start > Turn Off Computer
> Restart). Once the computer is back up, check for the "disconnected network"
icon.
If you cannot fix the network problem, it is possible for a client computer to run
on its own backup data.
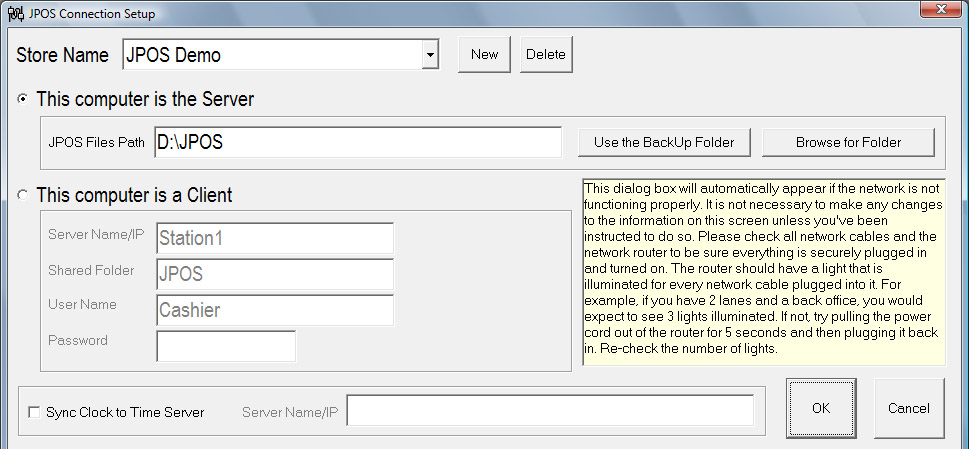
To set up a client to run on its backup data: In the JPOS Connection Setup dialog
box, select the "This computer is the Server" option > click the "Use
the BackUp Folder" button (this will set the "JPOS Files Path" field
to the path of your backup folder) > click the "OK" button. The settings
will be saved the and the JPOS Connection Setup dialog box will close. Now run the
JPOS touchPOS program. The program will run normally and all transactions will be
saved directly to the local backup folder. Using the backup folder is not meant
to be a permanent solution. Please contact us if you
cannot get your network working properly.
Default settings for a JPOS server station:
Syncing to a Time Server
The "Sync Clock to Time Server" section allows you to specify a Time Server.
This ensures that all computers on your network have exactly the same date and time
as the computer you designate as the Time Server. Generally you want to specify
a computer in a locked office (or a computer that requires a password to access)
as the Time Server so that the time and date are not able to be manipulated by an
employee. Time and date syncing are important for security reasons. It is possible
for any computer on the network to be manually set to the wrong date and time and
it is also possible for the date and time to be incorrectly set if the battery on
the motherboard loses its charge. Since all JPOS sales transactions are time/date
stamped, it would be possible for transactions to be filed under the wrong date
and time. Syncing to a Time Server causes all computers to have the exact same time
and date and avoid this problem. This will also make it easier to sync transaction
activity with DVR security systems.
To set a computer up as a Time Server:
Check the "Sync Clock to Time Server" checkbox. In the Server Name/IP
field, type in the name of the computer you want to specify as the Time Server (ie.
Station0, or 192.168.1.100).
A computer that is using a Time Server will check and sync its clock with the date/time
of the Time Server before each JPOS transaction is saved. This makes it impossible
for a transaction to be saved with the wrong date/time stamp. If the date/time of
the client computer is off by more than 60 seconds from the Time Server, an entry
is logged in a file for your inspection. This file will help you to determine if
a computer needs a new motherboard battery or if an employee is trying to manipulate
the date/time.